Battery switch on travel trailer function is crucial for managing your RV’s power. Understanding how these switches work, from the different types available (single-pole, double-pole, etc.) to safe connection and disconnection procedures, is key to preventing electrical issues and ensuring a smooth camping experience. This guide breaks down the intricacies of travel trailer battery switches, helping you master their use and troubleshoot any problems that might arise.
We’ll cover everything from identifying the right switch for your needs and installing it correctly, to understanding how it integrates with other parts of your RV’s electrical system like solar panels and inverters. Safety is paramount, so we’ll also detail essential precautions to take when working with batteries and switches to keep yourself and your RV safe.
Battery Switch Types in Travel Trailers
Choosing the right battery switch for your travel trailer is crucial for managing your power system effectively and safely. Different switches offer varying levels of control and complexity, each with its own set of advantages and disadvantages. Understanding these differences will help you select the best option for your needs.
Single-Pole Battery Switches
A single-pole battery switch is the simplest type. It’s essentially an on/off switch for a single battery. This means you can disconnect the battery from the trailer’s electrical system entirely. The advantage is its simplicity and low cost. The disadvantage is that it only controls one battery, making it unsuitable for setups with multiple batteries (like a house battery and a starting battery).
So, you’re planning a trip? Awesome! Don’t forget travel insurance – it’s a lifesaver. Check out Aon travel insurance for comprehensive coverage. They offer a range of plans, so you can find one that fits your needs and budget. Speaking of options, if you prefer a slightly different provider, you might also want to look into Aon travel insurance – they often have great deals, especially for luxury trips! Seriously, don’t skip this step; it’s worth the peace of mind.
Wiring is straightforward: the switch is placed in the positive (+) cable leading from the battery to the trailer’s electrical system.
Double-Pole Battery Switches
Double-pole switches offer more control. They’re capable of disconnecting both the positive (+) and negative (-) terminals of a single battery simultaneously. This provides improved safety by ensuring a complete break in the circuit, minimizing the risk of accidental shorts or sparks. While offering enhanced safety over a single-pole switch, it still only manages one battery. Wiring involves connecting both the positive and negative cables through the switch.
Double-Pole, Double-Throw (DPDT) Battery Switches
DPDT switches are the most versatile option. They allow you to switch between two separate battery banks (e.g., a house battery and a starting battery) or connect both simultaneously. This provides flexibility for managing power sources, allowing you to choose which battery or batteries power your appliances. However, they are more complex to wire and generally more expensive than single-pole or double-pole switches.
A common application is to switch between the deep-cycle house battery for appliances and the starting battery for the vehicle engine.
Battery Switch Wiring Diagrams Comparison
While detailed diagrams require visual representation, we can describe the key differences. A single-pole switch has one input (from the battery’s positive terminal) and one output (to the trailer’s electrical system). A double-pole switch has two inputs (positive and negative from the battery) and two outputs (positive and negative to the trailer). A DPDT switch has two inputs (positive and negative from each battery) and two sets of outputs, allowing for selection between batteries or combined power.
Comparison of Battery Switch Types
| Feature | Single-Pole | Double-Pole | Double-Pole, Double-Throw (DPDT) |
|---|---|---|---|
| Number of Batteries Controlled | One | One | Two or more (selectable) |
| Safety | Low (only positive disconnect) | Medium (positive and negative disconnect) | Medium to High (depending on installation and additional safety measures) |
| Complexity | Low | Medium | High |
| Cost | Low | Medium | High |
| Ease of Installation | Easy | Medium | Difficult |
Troubleshooting Battery Switch Issues
Dealing with a malfunctioning battery switch in your travel trailer can be frustrating, leaving you without power when you need it most. Understanding the common causes and how to troubleshoot them can save you time, money, and a lot of headaches. This section will guide you through the process of diagnosing and fixing problems with your travel trailer’s battery switch.
Battery switch problems typically manifest as a complete lack of power, intermittent power failures, or even a blown fuse. These issues often stem from simple problems that can be easily resolved, but sometimes deeper issues require more attention. Let’s explore the most common culprits and how to address them.
Common Battery Switch Problems and Their Causes
Several factors can contribute to a malfunctioning battery switch. These range from simple corrosion to more serious electrical problems. Understanding these common issues is the first step towards effective troubleshooting.
- No Power: This is the most obvious sign of a problem. It could indicate a blown fuse, a faulty switch, a disconnected wire, or a problem with the battery itself. A simple visual inspection often reveals loose or corroded connections.
- Blown Fuses: Fuses are designed to protect your electrical system from overloads. A blown fuse indicates an excessive current draw somewhere in the circuit. This could be due to a short circuit, a faulty appliance, or an overloaded system. Check the fuse box for blown fuses (indicated by a broken filament inside the fuse).
- Corrosion: Corrosion on the battery terminals or switch contacts is a very common problem, especially in humid or salty environments. Corrosion restricts current flow, leading to weak or intermittent power. It often appears as a white or green powdery substance.
- Loose Connections: Loose connections at the battery terminals, the switch itself, or anywhere in the wiring can cause intermittent power or complete power failure. Vibration from travel can loosen connections over time.
- Faulty Switch: In some cases, the switch itself may be faulty. This might involve an internal break in the switch mechanism, or a failure of the internal contacts.
Troubleshooting Steps for a Non-Functional Battery Switch
A systematic approach to troubleshooting will help you pinpoint the source of the problem efficiently. Following these steps will guide you through the process.
So, you’re planning a trip? Awesome! Don’t forget to sort out your travel insurance – it’s a lifesaver. Check out aon travel insurance for comprehensive coverage; they’re pretty solid. Then, once you’ve got that sorted, start thinking about accommodation. If you’re after luxury, aon travel insurance often partners with high-end resorts, so it might be worth looking into their packages for a seamless booking experience.
Happy travels!
- Visual Inspection: Begin by carefully inspecting the battery switch, its connections, and the associated wiring. Look for loose wires, corrosion, or any signs of damage. Pay close attention to the terminals on both the battery and the switch itself.
- Check Fuses: Examine the fuse box for any blown fuses. Replace any blown fuses with fuses of the correct amperage rating. If a fuse blows immediately after replacement, there’s likely a short circuit somewhere in the system.
- Clean Connections: Use a wire brush or sandpaper to clean any corrosion from the battery terminals and the switch contacts. Apply a corrosion inhibitor to prevent future corrosion. Ensure all connections are tight and secure.
- Test the Switch: With the connections clean and secure, test the switch to see if it’s functioning correctly. Use a multimeter to check for continuity across the switch contacts when it’s turned on and off. If the switch shows no continuity, it needs to be replaced.
- Trace Wiring: If the problem persists, carefully trace the wiring from the battery switch to the other components in your travel trailer’s electrical system. Look for any broken or damaged wires. If you find a damaged wire, it will need to be repaired or replaced.
- Battery Test: Finally, test the battery itself to ensure it’s holding a charge and is in good working order. A weak or dead battery will prevent power from reaching the system, even if everything else is working properly.
Battery Switch and Electrical System Integration
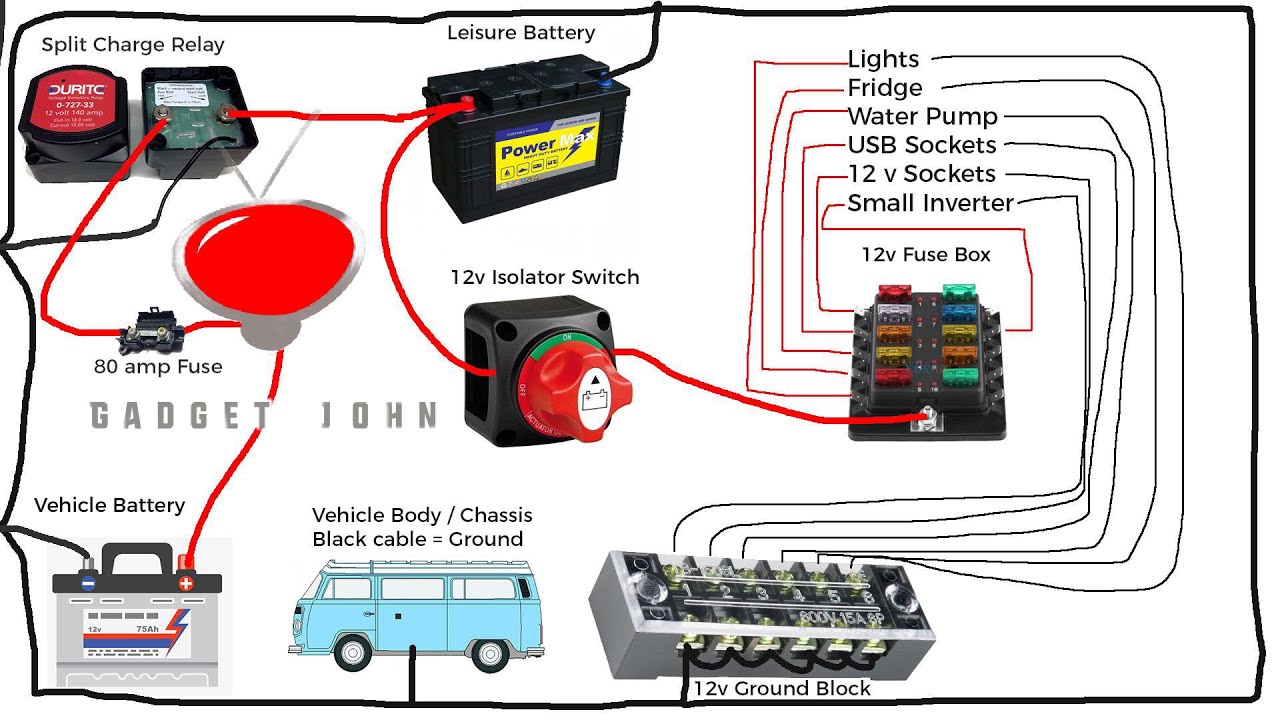
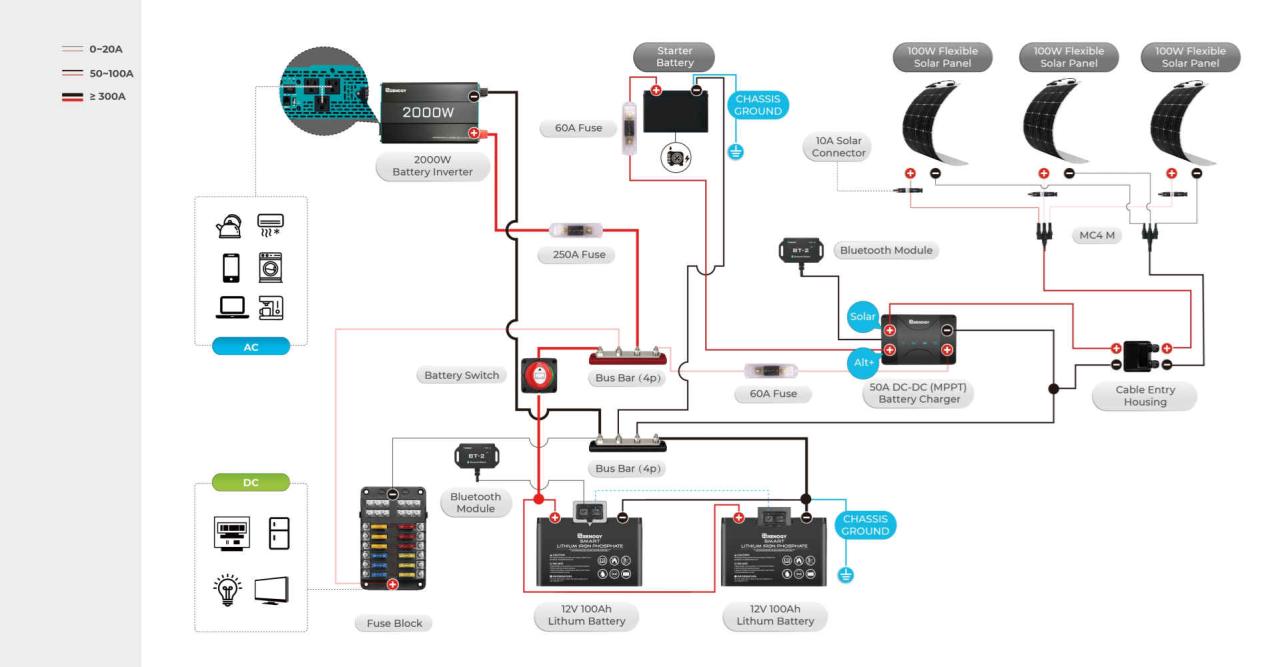
The battery switch isn’t just an on/off switch; it’s a crucial component that dictates how your travel trailer’s electrical system operates, influencing power flow and overall efficiency. Understanding its interaction with other systems like solar panels, inverters, and converters is key to maximizing your RV’s power management.The battery switch acts as the central control point for your house batteries. It determines whether power from your batteries is available to the trailer’s 12V system and, indirectly, to the 120V system via the converter.
The position of the switch affects charging and discharging processes and how various power sources interact.
Solar Panel Integration
Solar panels generate DC power that typically charges the house batteries. With the battery switch in the “on” position, the solar charge controller sends power directly to the batteries, ensuring they are topped up even when the trailer is disconnected from shore power. If the switch is off, the solar panels may still generate power, but that power won’t reach the batteries and will likely be wasted.
Some sophisticated systems might include a bypass feature allowing solar charging even with the battery switch off, but this is not standard.
Inverter Interaction
An inverter converts 12V DC power from the batteries into 120V AC power for running appliances that require AC current. The battery switch directly controls the 12V supply to the inverter. If the switch is off, the inverter won’t function, preventing the use of AC-powered devices. The inverter’s efficiency isn’t directly affected by the battery switch’s position, but its operation is entirely dependent on it.
Converter Relationship
A converter transforms 120V AC shore power or generator power into 12V DC power for charging the batteries and powering 12V components. The battery switch doesn’t directly control the converter’s input, but it does control the output to the 12V system. With the switch off, the converter can still charge the batteries (if wired correctly), but the 12V appliances won’t receive power from the batteries.
Impact on Electrical System Efficiency, Battery switch on travel trailer function
A properly functioning battery switch contributes to system efficiency by preventing unnecessary battery drain when not needed. When the switch is off, parasitic drain from devices connected to the 12V system is minimized, extending battery life and preventing a dead battery. Conversely, a faulty switch could lead to continuous battery drain, even when the trailer is not in use.
Proper use of the switch also allows for better management of power sources, preventing overcharging or over-discharging.
Power Distribution Comparison: With and Without a Battery Switch
Without a battery switch, all power sources would be directly connected to the electrical system, making it difficult to isolate components and manage power flow effectively. This increases the risk of overcharging batteries or draining them completely, potentially damaging sensitive equipment. The system would be less efficient, with greater potential for energy waste.With a battery switch, you gain precise control over power distribution.
You can disconnect the house batteries from the system to prevent drain when not in use, conserving battery life and preventing accidental discharges. This allows for targeted charging from different sources (solar, shore power, generator) without interfering with the operation of connected appliances.
Diagram Illustrating Power Flow
Imagine two diagrams. Diagram 1: Without Battery SwitchThis diagram shows a simple, linear flow. Shore power or generator power feeds directly into the converter, which charges the batteries and supplies power to the 12V system. Solar panels directly charge the batteries. The 12V system then powers 12V devices.
The inverter takes power from the batteries to power 120V devices. There is no isolation between components. Diagram 2: With Battery SwitchIn this diagram, the battery switch is positioned between the batteries and the rest of the 12V system. Shore power and the generator still feed into the converter, which charges the batteries. Solar panels still charge the batteries.
However, the battery switch acts as a gate. When “on,” power flows from the batteries to the 12V system and the inverter. When “off,” the batteries are disconnected from the rest of the system. This isolation protects the batteries and allows for more controlled power management.
Mastering your travel trailer’s battery switch is a vital skill for any RVer. By understanding the different types, installation procedures, troubleshooting techniques, and safety precautions, you’ll be equipped to manage your RV’s power efficiently and safely. Remember, regular inspection and proper maintenance are key to preventing problems and ensuring years of reliable service from your battery system. Happy travels!
Q&A: Battery Switch On Travel Trailer Function
What size battery cables should I use with my battery switch?
The appropriate cable size depends on the amperage draw of your appliances. Consult a qualified electrician or use an online cable sizing calculator to determine the correct gauge.
How often should I inspect my battery switch?
Regularly inspect your battery switch for corrosion, loose connections, and signs of damage at least once a year, or more frequently if you use your RV extensively.
Can I use a battery switch with a solar panel system?
Yes, but you’ll need to ensure the switch is compatible with your solar panel’s voltage and amperage. A qualified installer can help you integrate these systems safely.
What should I do if my battery switch is not working?
First, check fuses and connections. If the problem persists, consult a qualified RV technician or electrician for diagnosis and repair.
